-
DOKUMENTACJA SYSTEMU
-
-
Dla użytkowników
-
-
- Business Intelligence
- Tworzenie raportu
- Uruchamianie reguły ręcznej dla wielu spraw
- Raporty BI - typ raportu "Planowanie zasobów"
- Operacje na raportach - rejestrowanie aktywności zmian w konfiguracji raportu
- Włączanie/wyłączanie możliwości eksportu danych do pliku Excel z poziomu raportu tabelarycznego
-
-
Dla twórców
-
-
- Interfejs systemu AMODIT - część 1, lista spraw, okno główne systemu
- Interfejs systemu AMODIT - część 2, formularz sprawy
- Interfejs systemu AMODIT - część 3, lista raportów
- Interfejs systemu AMODIT - część 4, raport
- Interfejs systemu AMODIT - część 5, użytkownicy
- Interfejs systemu AMODIT - część 6, grupy
- Interfejs systemu AMODIT - część 7, słowniki
- Interfejs systemu AMODIT - część 8, ustawienia systemowe
- Interfejs systemu AMODIT - część 9, logi systemowe
- Już nie wysyłamy, ale dodajemy komentarze :-)
- Ukrywanie na formularzu identyfikatora sprawy
-
-
-
- Przenoszenie definicji procesu miedzy środowiskami
- Unknown procedure
- Ustawienia procesu
- Źródło utworzenia sprawy
- Możliwość zablokowania edycji dokumentów z poziomu ustawień procesu
- Rejestrowanie zdarzeń związanych z podglądem lub pobieraniem dokumentów
- Częściowe wyłączenie wyszukiwania pełno tekstowego per proces
- Ukrywanie na formularzu identyfikatora sprawy
-
- Articles coming soon
-
-
- Dodawanie pól do formularza z poziomu sprawy
- Dodawanie pól na formularzu
- Dodawanie, usuwanie, przenoszenie pól na formularzu
- Graficzny edytor formularza
- Sekcja
- Rozróżnienie pól lub kolumn o takich samych nazwach podczas konfiguracji raportu
- Zmiana sposobu wyświetlania nazw technicznych i wyświetlanych pól w raportach w przypadku duplikatów nazw
- Silnik reguł - konstrukcja językowa [nazwa pola odnośnik].[nazwa pola]
- Brak możliwości zmiany typu pola na tabelaryczny
- Blokada edycji sekcji 3- lub 4-kolumnowych w edytorze graficznym formularza
-
-
- Blokowanie oraz zezwalanie na dodawanie plików z wybranymi rozszerzeniami
- Pole - Dokument
- Wydzielanie dokumentów
- Możliwość zablokowania edycji dokumentów z poziomu ustawień procesu
- TrustCenterSetSigningPeriod()
- GetAttachmentFromTemplate()
- ConvertFileToPDFEx()
- Parametr systemowy - "Path for files banned for security reasons"
- Maksymalny rozmiar pliku w AMODIT
-
-
-
- Język skryptowy reguł
- Pola systemowe dla każdej sprawy
- Reguła okresowa dla procesu
- Reguły tabeli
- Typy reguł biznesowych
- Tytuł sprawy
- Użycie parametrów w regułach
- Lista typów reguł procesu i opcji ich konfiguracji
- Jak sterować przepływem zdarzeń, korzystając z instrukcji warunkowej "if ... else ..."?
- Reguła okresowa według własnego harmonogramu
- How to disable a process rule from running
- Potwierdzenie wykonania reguły ręcznej
- Potwierdzenie wykonania reguły ręcznej - część 2
- Reguła okresowa dla procesu według własnego harmonogramu
-
-
- CallRest i CallWebSite
- ERP_GetDocumentExportStatus
- ExecuteSQL()
- FindUsersInAD()
- foreachobject
- GetSystemParameterValue
- GetUserDataFromAD
- GetXML
- Integracja z systemami bankowymi (przelewy masowe)
- JsonPath
- RemoteExecuteSQL()
- XmlDecode
- XmlEncode
- XPath
- GetJSON
- Function GetJSON() - how it works
- Integracja z usługą e-Doręczenia Poczty Polskiej
- Zewnętrzne źródła danych - typ połączenia "File"
- OpenAIExecuteQuery()
- Eksport - import ustawień parametrów integracji z innymi systemami
- Połączenia nazwane do baz danych
- Zewnętrzne serwisy, z którymi łączy się AMODIT
- Integracja DocuSign z Amodit - Rozwiązanie dla Istniejących Użytkowników
- Show all articles ( 8 ) Collapse Articles
-
- AttachmentsCount
- ConditionalGet
- ConditionalMax
- ConditionalMin
- ConditionalSetTableRowsSum
- ConditionalSum
- CountConnectedClosed
- CountConnectedOpen
- CountDocuments
- CountRows
- DateDiff
- DayDiff
- GetExchangeRate
- HourDiff
- IsNumber
- Max
- Min
- MonthDiff
- NextNumber()
- Round
- Sum
- ToNumber
- WorkDayDiff
- YearDiff
- Ograniczenie precyzji liczb w polach typu numerycznego
- RegisterNextNumber()
- FindAndRegisterNextNumber()
- FindNextNumberByDate()
- GetLastNumber()
- GetNumbersList()
- GetSortValue()
- RemoveCaseFromNextNumber()
- RemoveNextNumber()
- Renumerate()
- ResetNextNumber()
- Show all articles ( 20 ) Collapse Articles
-
- CheckOverlappingDates
- CurrentDateTime
- DateAdd
- DateDiff
- DatePart
- DateTime
- DayDiff
- DeleteDeadline
- HourDiff
- MonthDiff
- SendCalendarMessage()
- SetReminder
- Today
- WorkDayDiff
- YearDiff
- SetDateFilter()
- Show all articles ( 1 ) Collapse Articles
-
- AddTableRow
- CollapseSection
- CopyTableData
- CountRows
- DisableField
- DisableRow
- EnableField
- EnableRow
- ExpandSection
- FieldIsCorrect
- FieldIsIncorrect
- FieldIsNotRequired
- FieldIsRequired
- FieldOriginalValue
- FieldValueChanged
- FillFieldsFromString
- FillFromSkanujTo
- FillTableWithDictionary
- Get
- HideColumn
- HideField
- HideRow
- HideSection
- IsEmpty
- IsFormValid
- IsUniqueValue
- IsValidFieldValue
- NextNumber()
- RemoveTableRow
- SaveCase
- SendCasePrintMail
- Set
- SetDictionaryFilter
- SetFieldAlias
- SetFieldInfo
- SetListChoices
- SetReferenceFilter
- SetTemplate
- SetUserFieldSettings
- SetUserFilter
- ShowColumn
- ShowField
- ShowRow
- ShowSection
- SignCase
- SignField
- StartProgress
- StopProgress
- ToggleField
- ToggleSection
- SetAttachmentFieldSettings
- AddCasePrint
- Blokada edycji sekcji 3- lub 4-kolumnowych w edytorze graficznym formularza
- Show all articles ( 38 ) Collapse Articles
-
- AddTableRow
- ConditionalGet
- ConditionalSet
- CopyTableData
- CountRows
- DisableRow
- EnableRow
- FillTableWithDictionary
- foreachrow
- forrow
- Get
- GetFromPrevRow
- HideColumn
- HideField
- HideRow
- Max
- Min
- RemoveTableRow
- Set
- ShowColumn
- ShowRow
- SortTable
- Sum
- GetJsonFromCsv()
- Show all articles ( 9 ) Collapse Articles
-
- EndsWith
- foreachstring
- FormatValue
- GetAttachmentContent
- GetComments
- IndexOf
- IsNumber
- Length
- NextNumber()
- NumberToMoneyText
- RegExp
- ReplaceRegionalLetters
- StartsWith
- StringContains
- StringFormat
- StringReplace
- StripHTML
- Substring
- ToLower
- ToNumber
- ToUpper
- Trim
- Validate
- ValidatePLNIP
- XmlDecode
- XmlEncode
- XPath
- StringToBase64
- GetJsonFromCsv()
- Base64ToString()
- Char()
- Show all articles ( 16 ) Collapse Articles
-
- AddAttachmentFromTemplate
- AddBarcode
- AddFileToSharepoint
- AttachmentsCount
- Blokowanie oraz zezwalanie na dodawanie plików z wybranymi rozszerzeniami
- ChangeAttachmentName
- ConvertFileToPDF
- CountDocuments
- DeleteAttachment
- DeleteAttachmentFromOCR
- FillDataFromOCR
- FillFromSkanujTo
- GetAttachmentContent
- GetAttachmentData
- GetBarcodes
- GetDictionaryDescription
- GetOfficeOnlineServerLink
- GetQRcodes
- HideAllTemplates
- HideTemplate
- MergeFilesToPDF
- SendAttachmentToOCR
- SendMessageWithAttachments
- SetTemplate
- SetTemplateFileName
- ShowTemplate
- TrustCenterAddNewSigners
- TrustCenterCancelSigning
- TrustCenterCheckStatus
- TrustCenterFinishSigning
- TrustCenterGetSignedBy
- TrustCenterGetSignedDocument
- TrustCenterGetSigners
- TrustCenterSendToSign
- SetAttachmentFieldSettings
- Wydzielanie dokumentów
- MoveAttachmentToCase
- CopyAttachmentToCase
- GetExcelData()
- AddCasePrint
- AddFileToList
- CreateAttachmentFromBase64
- CreateZip
- DownloadFile
- ExtractPagesFromDocument
- ExportReportToExcel
- GetAttachmentFromTemplate()
- ConvertFileToPDFEx()
- Parametr systemowy - "Path for files banned for security reasons"
- Maksymalny rozmiar pliku w AMODIT
- AddAttachment
- AmoditGetAttachmentContent
- Show all articles ( 37 ) Collapse Articles
-
- Podpis elektroniczny AMODIT wpisany do rejestru NBP
- TrustCenterAddNewSigners
- TrustCenterCancelSigning
- TrustCenterCheckStatus
- TrustCenterFinishSigning
- TrustCenterGetSignedBy
- TrustCenterGetSignedDocument
- TrustCenterGetSigners
- TrustCenterSendToSign
- TrustCenterSetSigningPeriod()
- TrustCenterSendToSignEx()
- TrustCenterEditSignersEx()
- TrustCenterGetSignersData()
- Zewnętrzne serwisy, z którymi łączy się AMODIT
- Integracja DocuSign z Amodit - Rozwiązanie dla Istniejących Użytkowników
-
- AddComment
- AssignProcedure
- CancelSignature
- CaseCreator
- CaseForwarder
- CaseOwner
- CaseProcessingTime
- CaseStatusId
- ChangeDeadline
- ChangeStage
- CheckAllRequiredParams
- CloseCase
- CopyAndAssignCase
- CopyCase
- CreateCase()
- CurrentStage
- CurrentUser
- DeleteCase
- DeleteDeadline
- FieldIsCorrect
- FieldIsIncorrect
- FieldIsNotRequired
- FieldIsRequired
- FireRules
- forcase
- ForwardCase
- GetDeadline
- GrantTemporaryAccessToCase
- IsFormValid
- IsPrint
- MailHeaderValue
- RedirectToCase()
- RedirectToUrl()
- SaveCase
- SetReminder
- ShowMessage
- SignCase
- SignField
- TerminateTemporaryAccessToCase
- Potwierdzenie wykonania reguły ręcznej
- Confirm()
- Potwierdzenie wykonania reguły ręcznej - część 2
- Ustawianie przypomnienia
- AddCaseEvent
- Show all articles ( 29 ) Collapse Articles
-
- AddProfilerEvent
- CallFunction
- CallRest i CallWebSite
- ERP_GetDocumentExportStatus
- ERP_PutDocumentInBufor
- ExecuteSQL()
- GetSystemParameterValue
- GetXML
- RemoteExecuteSQL()
- WriteToSystemLog()
- GetJSON
- try {...} catch {...}
- AddNews
- Silnik reguł - konstrukcja językowa [nazwa pola odnośnik].[nazwa pola]
- Zewnętrzne źródła danych - typ połączenia "File"
- OpenAIExecuteQuery()
- GetJsonFromCsv()
- Eksport - import ustawień parametrów integracji z innymi systemami
- Wyłączanie spraw z mechanizmu zastępstw
- CreateObject()
- AddObjectToList()
- RegisterNextNumber()
- FindAndRegisterNextNumber()
- FindNextNumberByDate()
- GetLastNumber()
- GetNumbersList()
- GetSortValue()
- RemoveCaseFromNextNumber()
- Wyłączenie niewykorzystywanych snipet’ów w edytorze reguł
- RemoveNextNumber()
- Renumerate()
- ResetNextNumber()
- Base64ToString()
- AddCaseEvent
- Show all articles ( 19 ) Collapse Articles
-
- AddCC
- AddCON
- AddUserToRole
- CaseCreator
- CaseForwarder
- CaseOwner
- ClearCC
- ClearCON
- CurrentUser
- FindUsersInAD()
- FullName
- GetAllUsers
- GetCC
- GetCON
- GetEmail
- GetExtOrganizationData
- GetManager
- GetManagers
- GetSubordinate
- GetUserData
- GetUserDataFromAD
- GetUsersFromRole
- GrantTemporaryAccessToCase
- IsCurrentUserOrDeputy
- IsDeputyOf
- IsGroupMember
- RemoveCC
- RemoveCON
- RemoveUserFromRole
- SetUserFilter
- UserIsExternal
- UsersOfGroup
- Przełączanie konta użytkownika
- Blokowanie edycji parametrów w profilu użytkownika
- AddUsersToGroup()
- RemoveUsersFromGroup()
- SetGroupMembers()
- Show all articles ( 22 ) Collapse Articles
-
-
- Raporty BI - typ raportu "Planowanie zasobów"
- Zewnętrzne źródła danych - typ połączenia "File"
- Operacje na raportach - rejestrowanie aktywności zmian w konfiguracji raportu
- Raporty BI - typ raportu "Tabela"
- Włączanie/wyłączanie możliwości eksportu danych do pliku Excel z poziomu raportu tabelarycznego
- Przekroczenie limitu ilości rekordów przy pobieraniu danych do pliku Excel z poziomu raportu
- Raporty BI - typ raportu "kanban"
- Raporty BI - typ raportu "treemap"
- Raporty BI - typ raportu kolumnowy pionowy lub poziomy
- Raporty BI - typ raportu pivot
- Raporty BI - typ raportu liniowy (wykres)
- Raporty BI - typ raportu kalendarz
- Raporty BI - typ raportu Gantt
-
- Articles coming soon
-
-
-
- Często zadawane pytania dotyczące tworzenia spraw na podstawie maila
- Dzielenie dokumentów przy pomocy kodów kreskowych
- Jak przygotować proces do współpracy z OCR skanuj.to?
- Konfigurowanie uruchamiania spraw na podstawie maila
- Zakładanie nowych spraw na podstawie maila lub skanu
- Zakładanie spraw na podstawie skanów i wypełnianie pól formularza danymi z tych skanów
- Źródło utworzenia sprawy
- Ustawienia poczty przychodzącej
-
- Dostęp tymczasowy
- Jak sterować przepływem zdarzeń, korzystając z instrukcji warunkowej "if ... else ..."?
- Przekazywanie sprawy wg reguł lub bez
- Reguły ręczne - przyciski akcji
- Sprawa zamknięta, dane na formularzu i działanie reguł
- Swobodne przekazywanie sprawy na kolejny etap
- Typy reguł biznesowych
- Lista typów reguł procesu i opcji ich konfiguracji
- Uruchamianie reguły ręcznej dla wielu spraw
- Potwierdzenie wykonania reguły ręcznej
- Confirm()
- Potwierdzenie wykonania reguły ręcznej - część 2
-
- Geolokalizacja
- Jak wyświetlić tylko część "czasu" w polu typu Data i czas ?
- Jak zmienić pole tekstowe w pole typu "password"
- Wydzielanie dokumentów
- Jak obsługiwane jest wysyłanie maili w AMODIT?
- Współpraca AMODIT z MS Excel
- Weryfikacja kontrahenta w Wykazie Podatnika VAT
- What to check when a text message/SMS does not come out from AMODIT
- Możliwość zablokowania edycji dokumentów z poziomu ustawień procesu
- Brak możliwości zmiany typu pola na tabelaryczny
- CreateObject()
- AddObjectToList()
- Przyciski akcji na formularzu sprawy - pole typu "Przyciski"
- Przełączanie konta użytkownika
- Częściowe wyłączenie wyszukiwania pełno tekstowego per proces
-
-
-
- Organizowanie zbierania podpisów
- Jak skonfigurować proces wysyłający dokumenty do podpisu?
- TrustCenterAddNewSigners
- TrustCenterCancelSigning
- TrustCenterCheckStatus
- TrustCenterFinishSigning
- TrustCenterGetSignedBy
- TrustCenterGetSignedDocument
- TrustCenterGetSigners
- TrustCenterSendToSign
- Integracja z podpisem kwalifikowanym SimplySign Certum by Asseco
- TrustCenterSetSigningPeriod()
- Integracja Autenti z Amodit - Rozwiązanie dla Polskich Organizacji
-
- Articles coming soon
-
-
Dla administratorów
-
- AMODIT w środowisku wielodomenowym
- Edycja danych użytkownika
- Organizacja zewnętrzna zapraszanie użytkowników
- Struktura organizacyjna
- Synchronizacja z Active Directory
- Uprawnienia w systemie AMODIT
- Użytkownicy
- Zakładanie konta użytkownika przez administratora
- Zakładanie nowej organizacji zewnętrznej
- Zarządzanie grupami użytkowników
- Zarządzanie kontem użytkownika
- Zastępstwa i nieobecności
- Zmiana hasła
- How to synchronize group members from an external source
- Parametr systemowy - EnableEditingDataOfSyncUsers
- Wyświetlanie adresu IP użytkownika
- Zdarzenia związane z logowaniem się użytkownika
- Przełączanie konta użytkownika
- Możliwość wyłączenia podstawowego obszaru "Wszystkie procesy"
- Blokowanie edycji parametrów w profilu użytkownika
- AddUsersToGroup()
- RemoveUsersFromGroup()
- SetGroupMembers()
- Show all articles ( 8 ) Collapse Articles
-
- Integracja ze skrzynką gmail
- Jak obsługiwane jest wysyłanie maili w AMODIT?
- Konfigurowanie uruchamiania spraw na podstawie maila
- Powiadomienia
- Ustawienia poczty przychodzącej
- Poczta przychodząca z outlook.office365.com
- Wyłączenie rejestrowania wpisów w tabeli usermail
- Parametr systemowy - "Path for files banned for security reasons"
- Link do logo organizacji wysyłanego w mailu
-
- Blokowanie oraz zezwalanie na dodawanie plików z wybranymi rozszerzeniami
- Ustawienia systemowe -Interfejs użytkownika
- Zarządzanie kodem licencyjnym w systemie AMODIT
- Logowanie się do systemu AMODIT (mechanizm podstawowy)
- Organizacja list procesów, raportów lub pozycji menu w kategorie (foldery) lub zakładki
- Parametry "User Profile Access" i "Manager Profile Access"
- Usługi
- Ustawienia systemowe - Ogólne
- Zadania
- Zezwalanie na wyświetlanie treści HTML w polach tekstowych
- What to check when a text message/SMS does not come out from AMODIT
- Antiforgery - ochrona przed atakami CSRF
- Parametr systemowy - EnableEditingDataOfSyncUsers
- Eksport - import ustawień parametrów integracji z innymi systemami
- Wyłączenie rejestrowania wpisów w tabeli usermail
- Konfiguracja wyszukiwania pełnotekstowego
- Logowanie z wykorzystaniem Multi Factor Authentication
- Połączenia nazwane do baz danych
- Przełączanie konta użytkownika
- Parametr systemowy - "Path for files banned for security reasons"
- Konfiguracja konta AppOnly w SharePoint
- Limity dynamicznych pól w systemie
- Show all articles ( 7 ) Collapse Articles
-
-
- Bezpieczeństwo systemu AMODIT - autoryzacja i autentykacja
- Bezpieczeństwo systemu AMODIT - zasady minimalnych uprawnień
- Logowanie się do systemu AMODIT (mechanizm podstawowy)
- Logowanie się do systemu AMODIT kontami m.in. Microsoft, Facebook, Google (mechanizmy dodatkowe)
- Parametry "User Profile Access" i "Manager Profile Access"
- Synchronizacja kont użytkowników z AzureAD
- Synchronizacja z Active Directory
- Uprawnienia w systemie AMODIT
- Parametr systemowy - EnableEditingDataOfSyncUsers
- Wyświetlanie adresu IP użytkownika
- Zdarzenia związane z logowaniem się użytkownika
- Logowanie z wykorzystaniem Multi Factor Authentication
- Przełączanie konta użytkownika
- Możliwość wyłączenia podstawowego obszaru "Wszystkie procesy"
- Blokowanie edycji parametrów w profilu użytkownika
-
- Blokowanie oraz zezwalanie na dodawanie plików z wybranymi rozszerzeniami
- Dodatkowe zabezpieczenia aplikacji webowej AMODIT
- Zezwalanie na wyświetlanie treści HTML w polach tekstowych
- Skanowanie antywirusowe wgrywanych dokumentów
- Antiforgery - ochrona przed atakami CSRF
- Logowanie z wykorzystaniem Multi Factor Authentication
- Parametr systemowy - "Path for files banned for security reasons"
-
- "Łagodne" kończenie zadań w momencie zatrzymywania usługi AMODAsynchronousService
- 4Eyes rule
- Bezpieczeństwo systemu AMODIT na etapie projektowania i tworzenia rozwiązań
- Monitor wydajności systemu AMODIT
- Transparentność w systemie AMODIT
- Uprawnienia w systemie AMODIT
- Systemowe źródła danych
- Raporty systemowe
- How to set up access levels to AMODIT WebAPI
- Operacje na raportach - rejestrowanie aktywności zmian w konfiguracji raportu
- Wyświetlanie adresu IP użytkownika
- Wyłączenie rejestrowania wpisów w tabeli usermail
- Logowanie z wykorzystaniem Multi Factor Authentication
- Połączenia nazwane do baz danych
- Rejestrowanie zdarzeń związanych z podglądem lub pobieraniem dokumentów
- Częściowe wyłączenie wyszukiwania pełno tekstowego per proces
- Zewnętrzne serwisy, z którymi łączy się AMODIT
- Włączanie/wyłączanie możliwości eksportu danych do pliku Excel z poziomu raportu tabelarycznego
- Przekroczenie limitu ilości rekordów przy pobieraniu danych do pliku Excel z poziomu raportu
- Maksymalny rozmiar pliku w AMODIT
- Link do logo organizacji wysyłanego w mailu
- Show all articles ( 6 ) Collapse Articles
-
-
-
Dla integratorów
-
- CallRest i CallWebSite
- Excel jako zewnętrzne źródło danych
- Excel jako źródło danych dla słownika zewnętrznego
- Integracja z bazą VIES (Potwierdzenie numeru VAT)
- Integracja z Krajowym Systemem e-Faktur poprzez KSeF Connector
- Integracja z systemami bankowymi (przelewy masowe)
- Moduł e-Nadawca w AMODIT
- Wymiana danych z systemami zewnętrznymi
- Źródło utworzenia sprawy
- Integracja z podpisem kwalifikowanym SimplySign Certum by Asseco
- Integracja z firmą kurierską FEDEX
- Integracja z firmą kurierską DHL
- Bankowe przelewy zagraniczne
- Zestawienie integracji dostępnych w AMODIT
- What to check when a text message/SMS does not come out from AMODIT
- Integracja z usługą e-Doręczenia Poczty Polskiej
- Zewnętrzne źródła danych - typ połączenia "File"
- OpenAIExecuteQuery()
- Eksport - import ustawień parametrów integracji z innymi systemami
- Zewnętrzne serwisy, z którymi łączy się AMODIT
- Konfiguracja konta AppOnly w SharePoint
- Integracja DocuSign z Amodit - Rozwiązanie dla Istniejących Użytkowników
- Integracja Autenti z Amodit - Rozwiązanie dla Polskich Organizacji
- Show all articles ( 8 ) Collapse Articles
-
Dla instalatorów
-
- Aktualne wersje
- Ile serwerów jest potrzebnych?
- Zarządzanie kodem licencyjnym w systemie AMODIT
- Konfiguracja kluczowych parametrów
- Procedury aktualizacji komponentów serwerów Windows i bazy danych, tzw. certyfikacja OS
- Przygotowanie serwera aplikacyjnego do instalacji
- Przygotowanie serwera bazy danych do instalacji
- Wirtualizacja serwerów
- Zalecane parametry serwerów
- Instalacja Platformy AMODIT
- Problemy po instalacji usługi AMODITAsynchronousService
- Konfiguracja wyszukiwania pełnotekstowego
- Połączenia nazwane do baz danych
- Zewnętrzne serwisy, z którymi łączy się AMODIT
- Maksymalny rozmiar pliku w AMODIT
-
- Aktualizacja Platformy AMODIT i .NET FRAMEWORK
- Aktualizowanie Platformy AMODIT
- Aktualne wersje
- Procedury aktualizacji komponentów serwerów Windows i bazy danych, tzw. certyfikacja OS
- Problemy po instalacji usługi AMODITAsynchronousService
- Eksport - import ustawień parametrów integracji z innymi systemami
- Konfiguracja wyszukiwania pełnotekstowego
- Maksymalny rozmiar pliku w AMODIT
-
- Header Content Security Policy
- Konfiguracja farmy serwerów frontend AMODIT
- Konfiguracja środowiska testowego i produkcyjnego na jednym serwerze aplikacyjnym
- Odbudowa indeksu wyszukiwania pełnotekstowego Lucene
- Eksport - import ustawień parametrów integracji z innymi systemami
- Przekroczenie limitu ilości rekordów przy pobieraniu danych do pliku Excel z poziomu raportu
- Konfiguracja konta AppOnly w SharePoint
-
-
Do uporządkowania
- Mapa rozwoju AMODIT TrustCenter
- Lista zmian w aplikacji SignApp
- Jak ponownie wysłać maila do osoby podpisującej dokument w systemie Trust Center
-
- Dezaktywacja baz AMODIT na chmurze
- Historia zmian Platformy AMODIT
- Lista artykułów na wiki - nowości lub aktualizacje
-
- OCR w AMODIT
- Automatyczne odczytywanie danych z faktur (OCR)
- Kody kreskowe - generowanie i odczytywanie
- Obsługa zastępstw w AMODIT
- Integracja z systemami bankowymi (przelewy masowe)
- Business Intelligence
- Podpisywanie dokumentów w systemie AMODIT z wykorzystaniem podpisu kwalifikowanego
- Instalacja programu Amodit SignApp
-
- Articles coming soon
How to synchronize group members from an external source
Summary
In this article we are describing how to synchronize some group members that come from some external source. This method may be suitable when you have a list of users that constitute a group and that group is to be used in AMODIT. That group itself is defined in some external source, i.e. a table in a database or an Excel file. Then you can configure an AMODIT group (its members) that it will be synchronized with the external source. If there is any change in the external source it will be automatically visible in the AMODIT group.
Prerequisities
You have to possess administrative rights to the AMODIT system or be in a user or group management role.
You have to also have some external data source configured in the AMODIT. This data source must have at least one column that contains userId, userLogin or userSyncId data (see details below). See also an article on how to configure an external data source based on an Excel file.
Steps
Follow these steps to configure the group synchronization with the external data source:
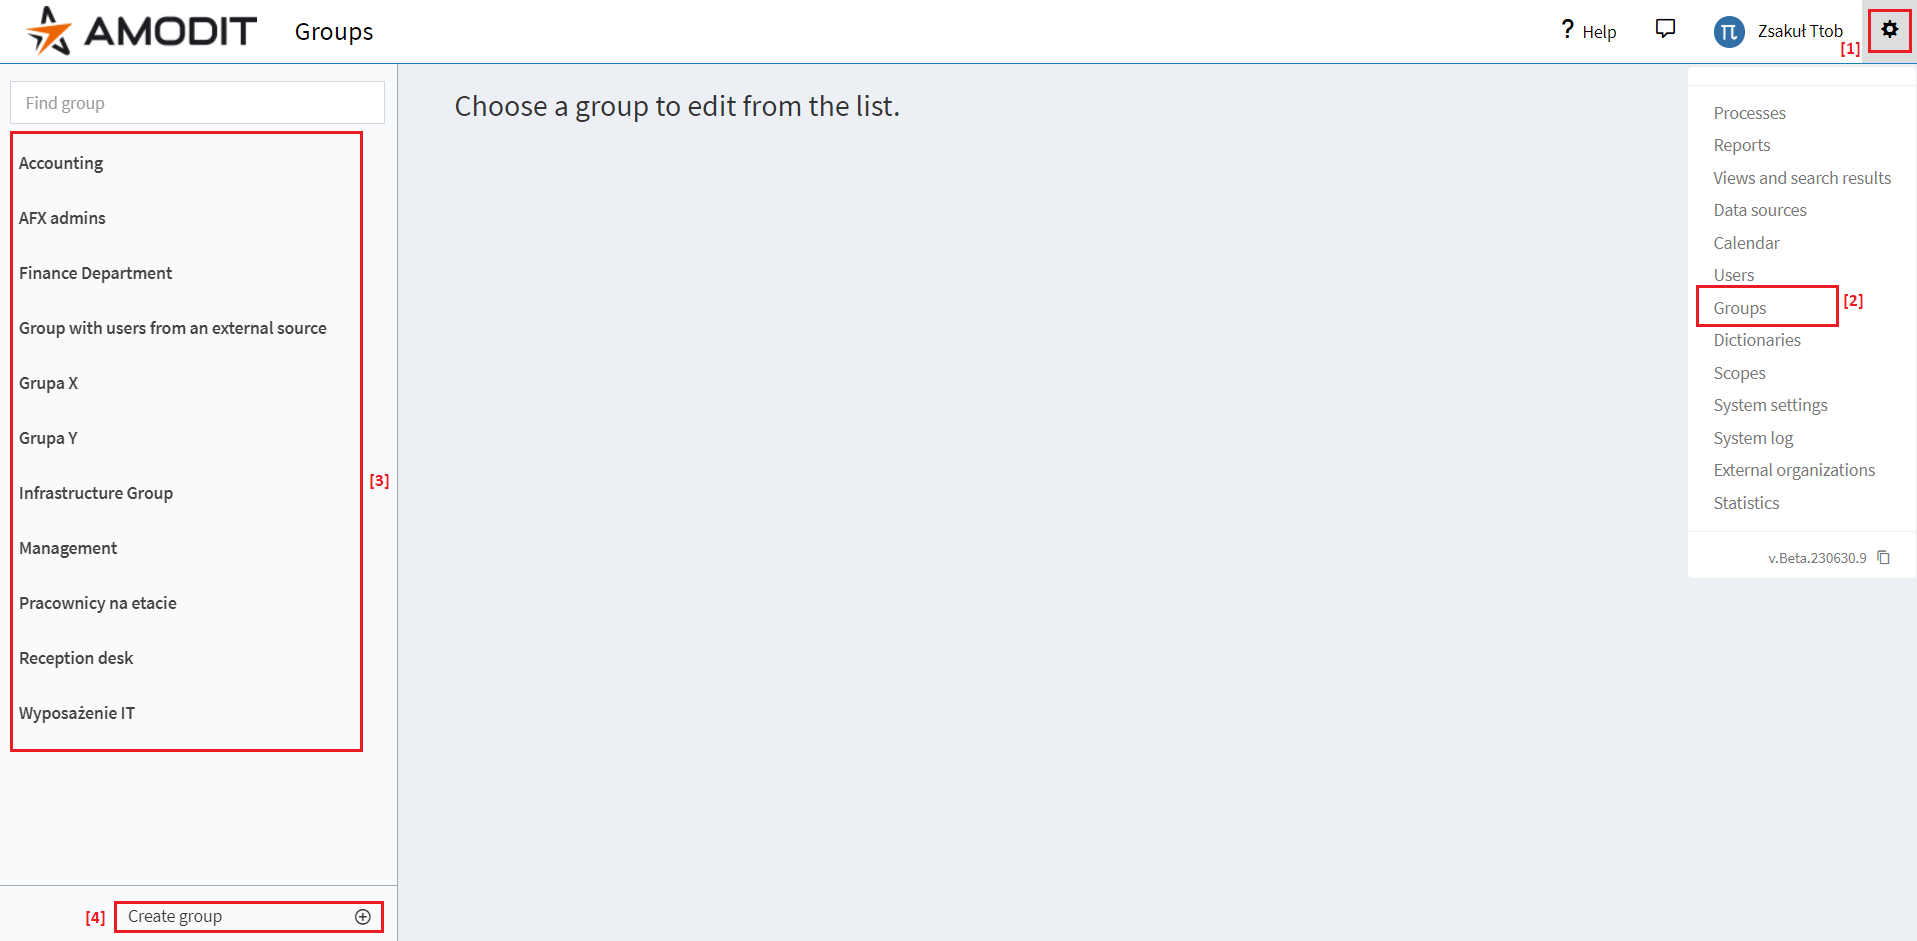
- [1] Go to AMODIT system settings.
- [2] Select „Groups” module.
- [3] Choose some existing group that is to be synchronized …
- [4] … or create a new one.
- [5] With the selected group …
- [6] … go to its settings.
- [7] Select the „Synchronization” tab.
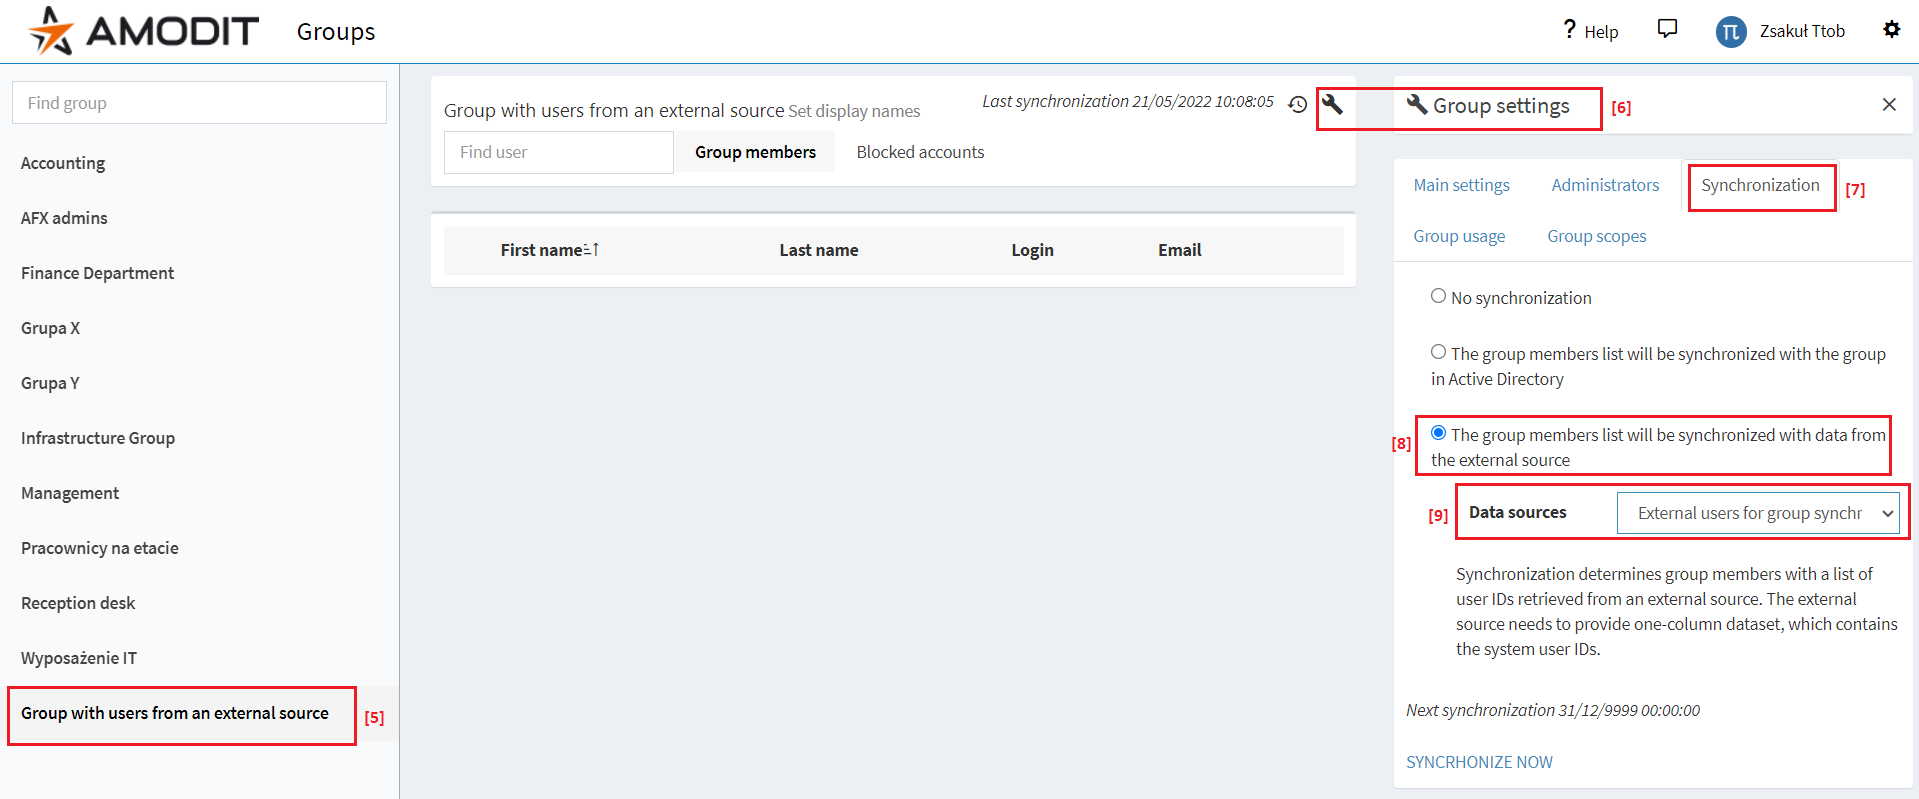
- [8] Choose the „The group members list will be synchronized with data from the external source” option.
- [9] Select the external data source from the list. For this article’s purposes we configured the „External users for group synchronization” data source that is shown on the picture below. This data source was created with data from some Excel file.
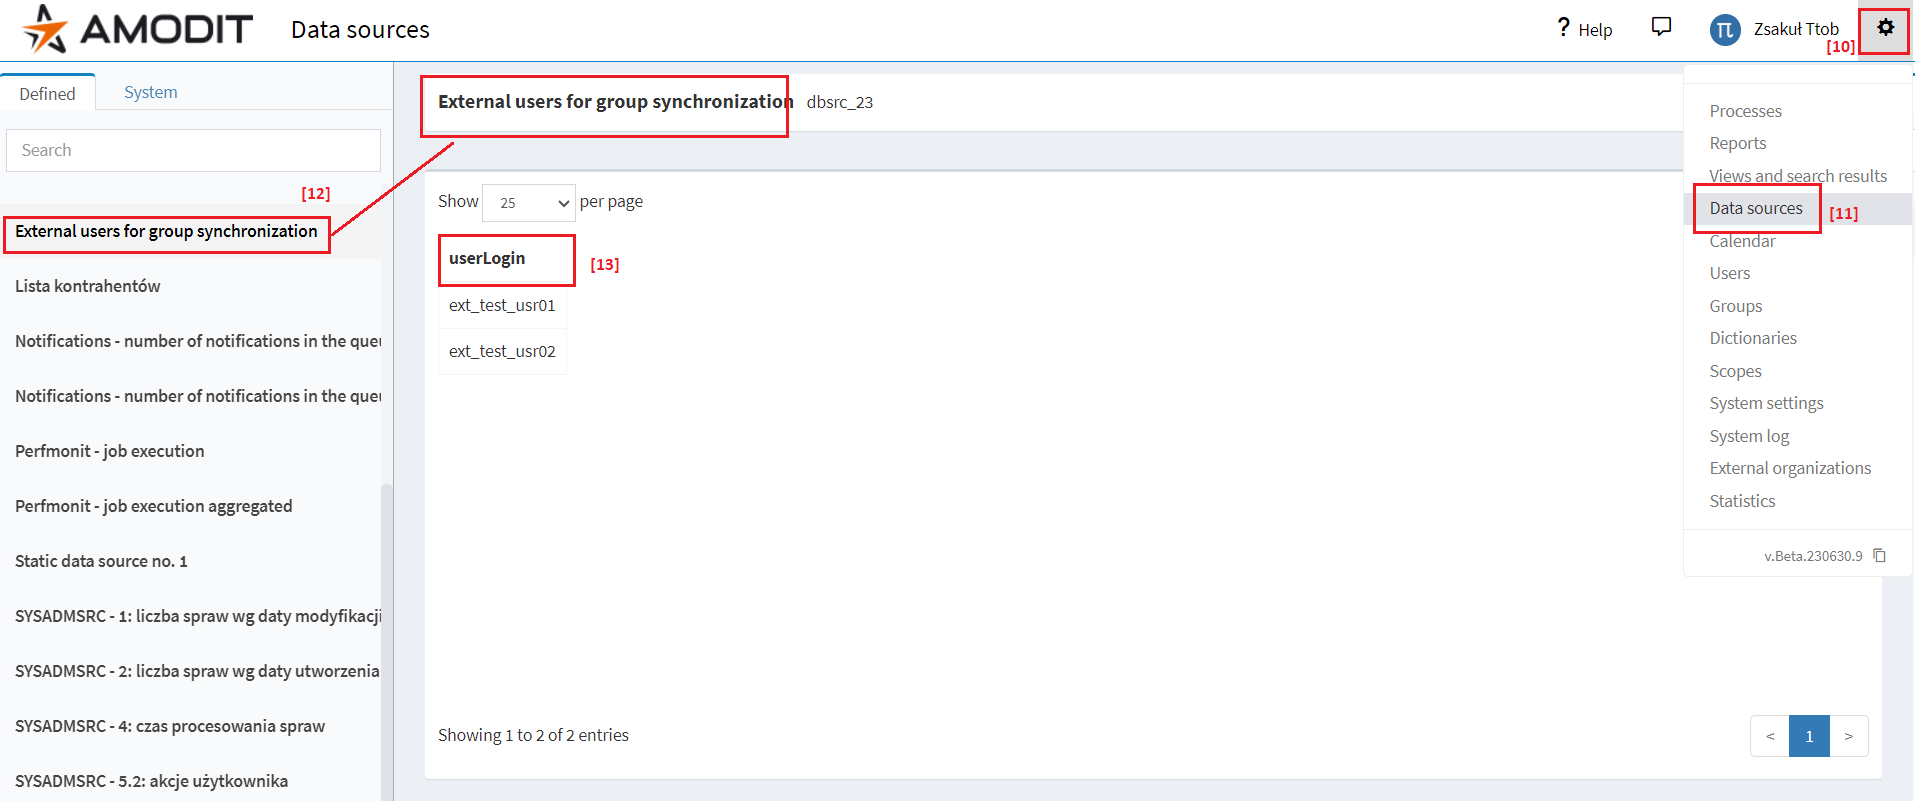
The data source is available in …
- [10] … system settings …
- [11] … in „Data sources” module …
- [12] … under already mentioned name.
- [13] IMOPRTANT! The data source has to contain at least one column named userId, userLogin or userSyncId. Using other names for column with users’ identificators will cause the synchronization process to fail.
When the group configuration has been done you can start synchronization manually.
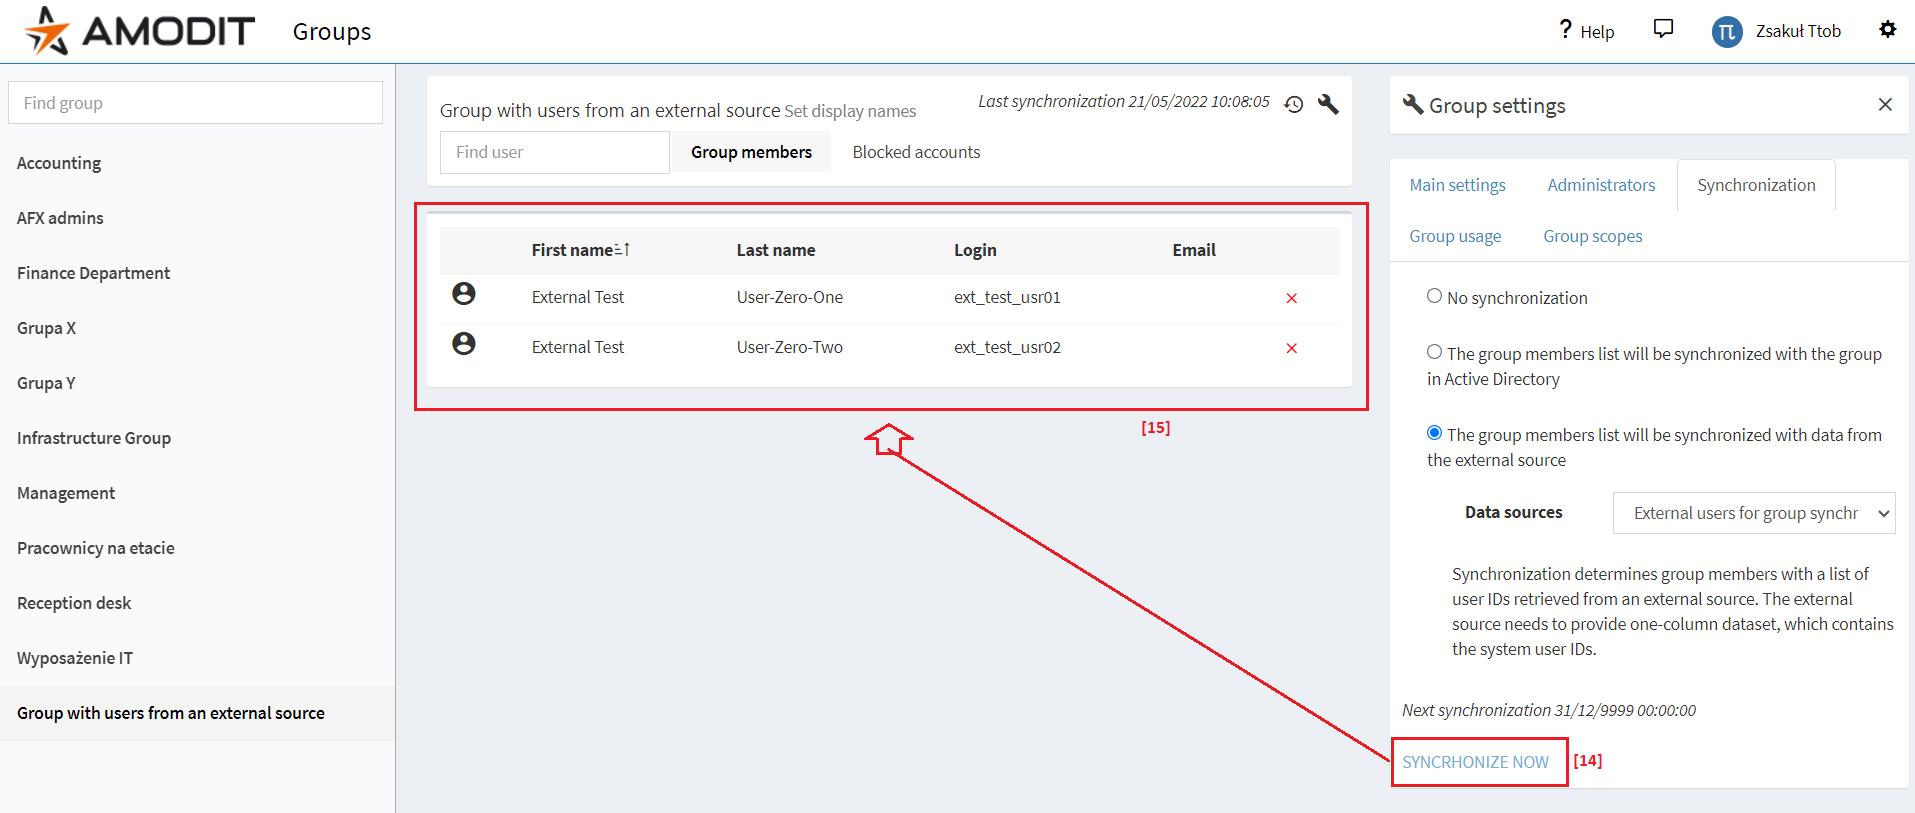
- [14] Click on „Synchronize now” link …
- [15] … and synchronization will start immediately. Group members will be added from the external data source.
You can also set up the synchronization process to run automatically.
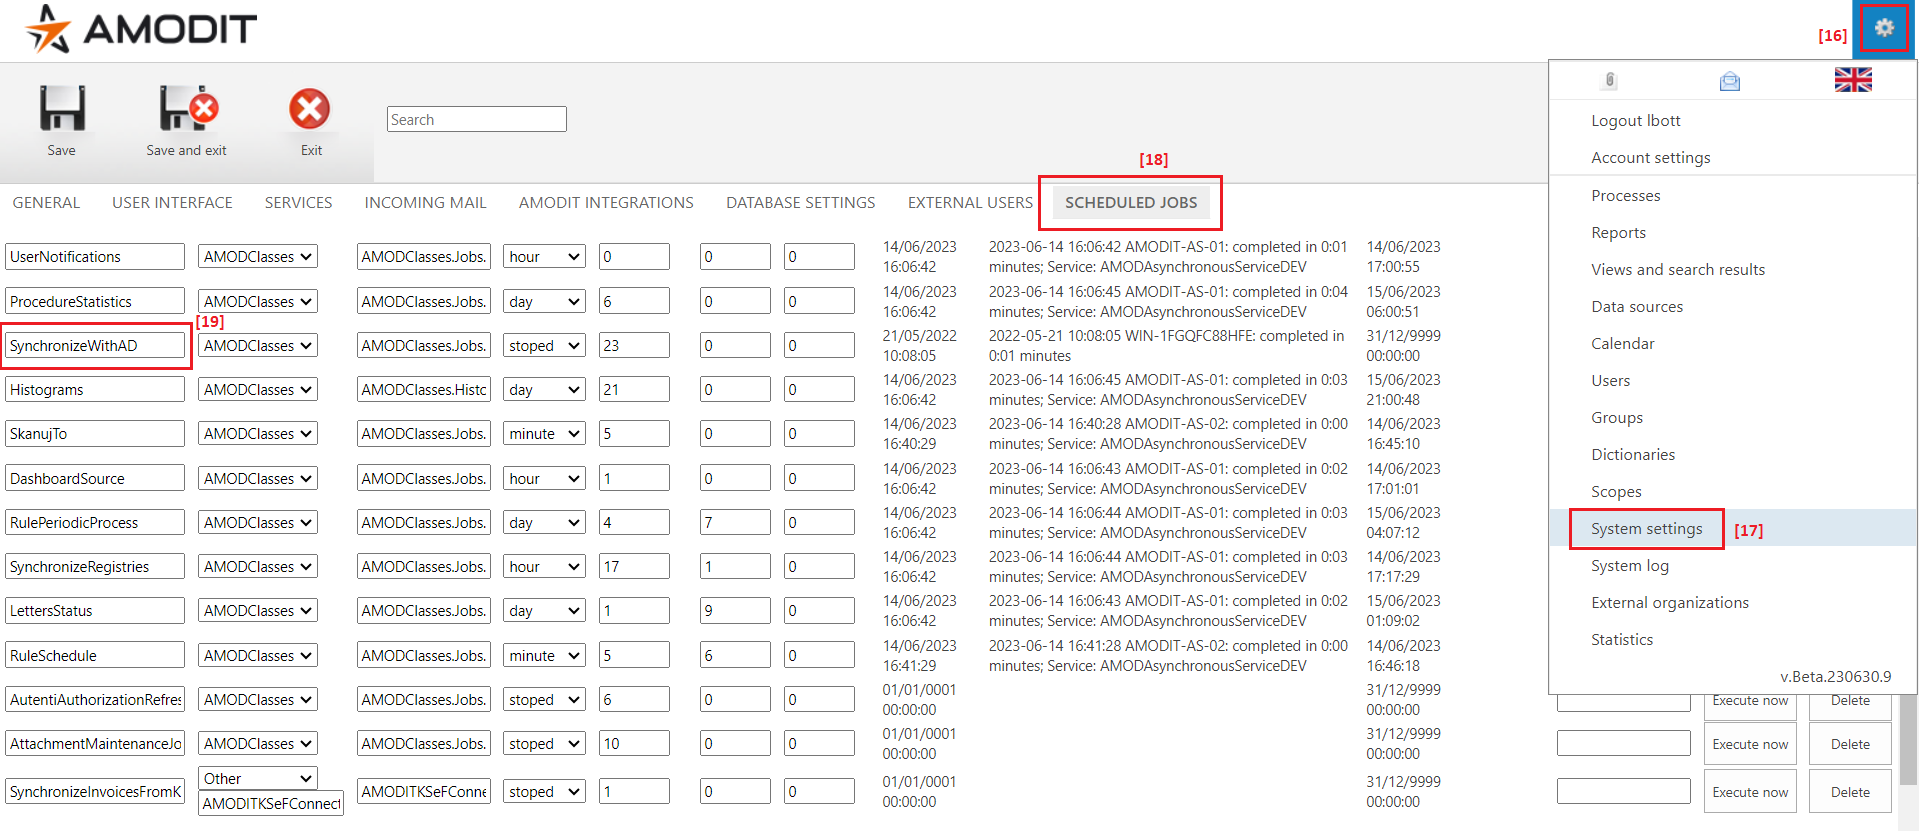
- [16] Go to the system settings.
- [17] Choose „System settings” module.
- [18] Select „Scheduled jobs” tab.
- [19] Set up a schedule parameters for the „SynchronizeWithAD” job.